Hexo 美化
![]()
虽然 NexT 的主题很漂亮,但问题是太受欢迎了,都快烂大街了。 好在它是一个开源项目,我们可以通过修改它的代码来个性话你的博客。 这篇教程要涉及到一些前端知识,可能没有那么 Novice friendly。
因为涉及到对 NexT 代码的修改,搞不好,可能引起 Hexo 无法工作。所以强烈建议使用 Git 对 NexT 进行备份。 具体使用方法请自行 Google。
准备工作🔗
- 一颗能折腾的心。
- 一定的前端知识。
正文🔗
最简单的方法🔗
美化你的 Hexo 的最简单方法 -> 安装我修改过的 NexT 在 Hexo 目录中使用命令
git clone https://github.com/Mogeko/hexo-theme-next.git themes/next
*记得删掉原来安装过的 NexT。
手动美化 Hexo🔗
如果有能力,推荐跟我一起手动改代码。 最好能明白我给你的代码都是做什么的,将来万一出了问题,也有个找到问题的方向。
圆形头像(头像旋转)🔗
NexT 默认的头像是方的。也不是说不好看,就是觉得不习惯,这个要看个人喜好。
在 /source/css/_custom/custom.styl 中添加一下代码就可以吧头像弄成圆的
// 圆形头像
.site-author-image {
  border-radius: 50%;
  -webkit-border-radius: 50%;
  -moz-border-radius: 50%;
  transition: 1.4s all;
}
然后,添加以下代码可以让头像在鼠标停留时旋转 180°
// 头像旋转
.site-author-image:hover {
  -webkit-transform: rotate(360deg);
  -moz-transform: rotate(360deg);
  -ms-transform: rotate(360deg);
  -transform: rotate(360deg);
}
点击头像跳转到 关于我 页面🔗
第一次用 Next,习惯性点了一下头像,本以为会跳转到什么页面,结果什么都没有发生,才发现那根本不是超链接。加上 关于我 页面正好没地方放,(觉得官方把 关于我 页面放进 menu 里很蠢)所以决定为头像增加一个超链接,跳转到 关于我 页面。
首先需要新建一个 about 页面,在 Hexo 文件夹中使用一下命令
hexo new page "about"
在 [Hexo 文件夹]/source/about/index.md 中编辑介绍自己的内容。
然后在 /layout/_macro/sidebar.swig 中,用一个 <a> 标签把头像包起来就可以了
像这样
<!--只节选了一部分,忽略上面的内容-->
<a href="/about/">
  <img
    class="site-author-image"
    itemprop="image"
    src="{{ url_for( theme.avatar | default(theme.images + '/avatar.gif') ) }}"
    alt="{{ theme.author }}"
  />
  <p class="site-author-name" itemprop="name">{{ theme.author }}</p>
</a>
<!--忽略下面的内容-->
 注意:href= 一定要填
 "/about/"
修改侧边滚动条的样式🔗
同样的,看个人喜好。你可以将侧边滚动条的样式修改得和我一样,(只对 webkit 内核的浏览器有效)只需要在 /source/css/_custom/custom.styl 中添加
// 更好的侧边滚动条
::-webkit-scrollbar {
  width: 10px;
  height: 10px;
}
::-webkit-scrollbar-button {
  width: 0;
  height: 0;
}
::-webkit-scrollbar-button:start:increment,
::-webkit-scrollbar-button:end:decrement {
  display: none;
}
::-webkit-scrollbar-corner {
  display: block;
}
::-webkit-scrollbar-thumb {
  border-radius: 8px;
  background-color: rgba(0, 0, 0, 0.2);
}
::-webkit-scrollbar-thumb:hover {
  border-radius: 8px;
  background-color: rgba(0, 0, 0, 0.5);
}
::-webkit-scrollbar-track,
::-webkit-scrollbar-thumb {
  border-right: 1px solid transparent;
  border-left: 1px solid transparent;
}
::-webkit-scrollbar-track:hover {
  background-color: rgba(0, 0, 0, 0.15);
}
::-webkit-scrollbar-button:start {
  width: 10px;
  height: 10px;
  background: url(../images/scrollbar_arrow.png) no-repeat 0 0;
}
::-webkit-scrollbar-button:start:hover {
  background: url(../images/scrollbar_arrow.png) no-repeat -15px 0;
}
::-webkit-scrollbar-button:start:active {
  background: url(../images/scrollbar_arrow.png) no-repeat -30px 0;
}
::-webkit-scrollbar-button:end {
  width: 10px;
  height: 10px;
  background: url(../images/scrollbar_arrow.png) no-repeat 0 -18px;
}
::-webkit-scrollbar-button:end:hover {
  background: url(../images/scrollbar_arrow.png) no-repeat -15px -18px;
}
::-webkit-scrollbar-button:end:active {
  background: url(../images/scrollbar_arrow.png) no-repeat -30px -18px;
}
顶部阅读进度条🔗
这个要稍微复杂点,需要改动 4 个文件。 完成后就可以拥有向我一样的顶部阅读进度条。
首先,在/layout/_partials/header.swig 模板文件里加上进度条的 div:
<div class="top-scroll-bar"></div>
在这个位置
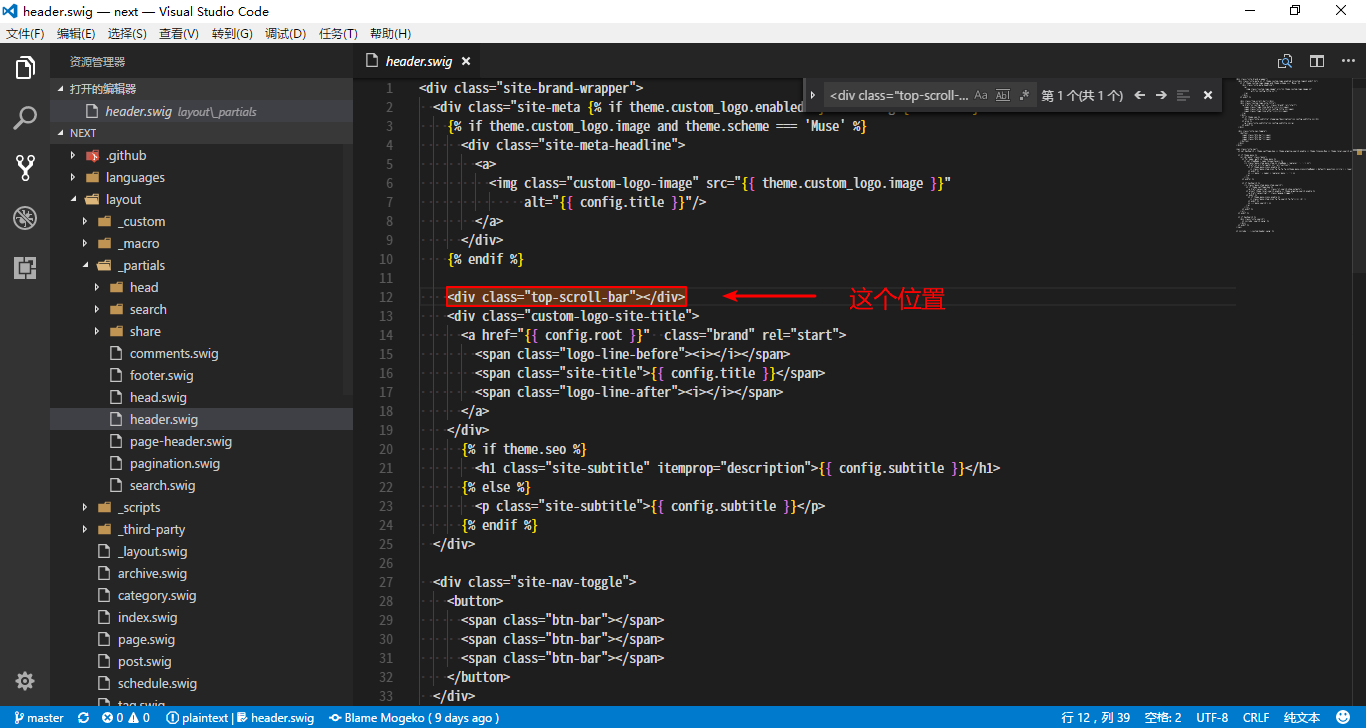 然后在
然后在/source/css/_custom/custom.styl 文件中为我们的进度条添加样式
// 顶部阅读进度条
.top-scroll-bar {
  position: fixed;
  top: 0;
  left: 0;
  z-index: 9999;
  display: none;
  width: 0;
  height: 2px;
  background: #6d6d6d;
}
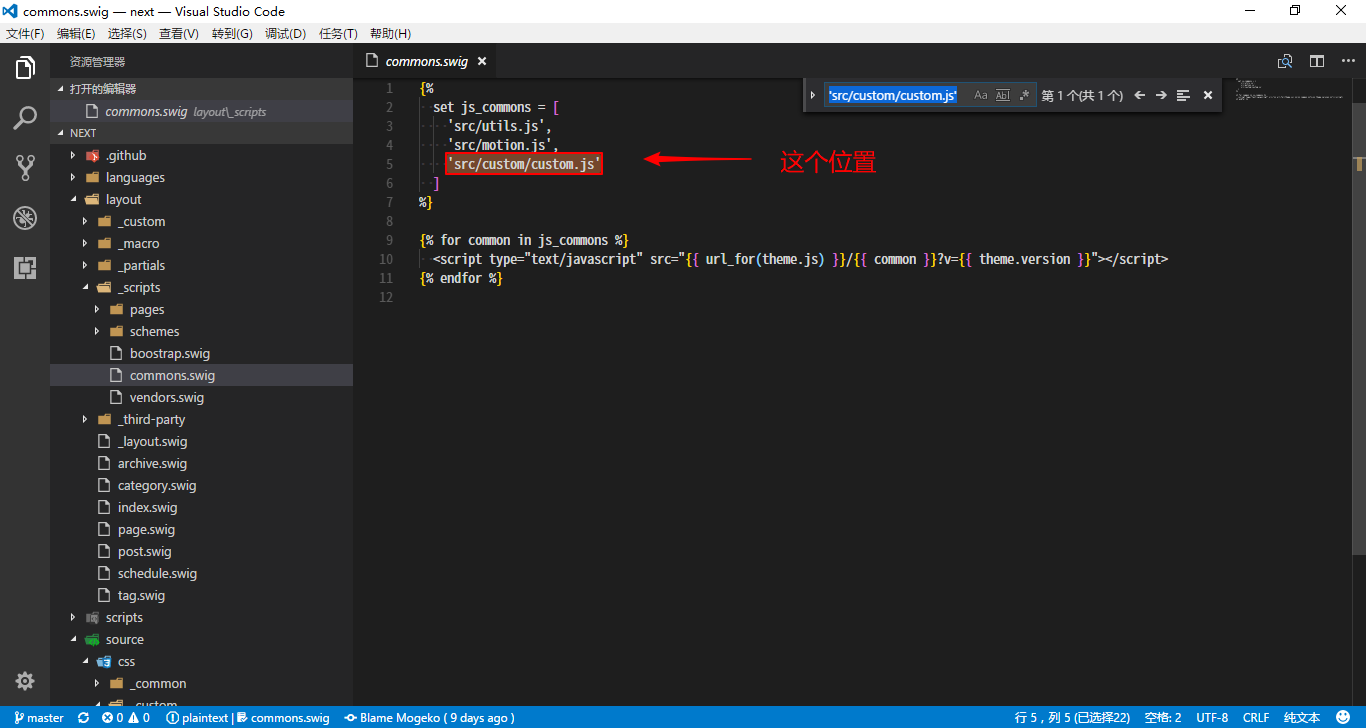
再然后,新建一个 js脚本 文件 /source/js/src/custom/custom.js,来控制我们的进度条。
$(document).ready(() => {
  $(window).scroll(() => {
    $(".top-scroll-bar").attr(
      "style",
      "width: " +
        ($(this).scrollTop() / ($(document).height() - $(this).height())) *
          100 +
        "%; display: block;",
    );
  });
});
最后,将我们新建的那个 js脚本引入到模板,使其生效。
在 /layout/_scripts/commons.swig 中,加入
'src/custom/custom.js'
在这个位置